> ## Documentation Index
> Fetch the complete documentation index at: https://help.konfhub.com/llms.txt
> Use this file to discover all available pages before exploring further.
# Participants: View, Manage and Export Your Attendees
> View, search, and filter all registrations. Transfer tickets, process refunds, approve waitlisted attendees, and download attendee data with QR codes.
Every person who registers for your event appears in the **Participants** section of your dashboard. This is your operational hub for attendee management — where you can search for a specific registrant, approve a waiting-list request, process a cancellation, transfer a ticket to a different person, bulk-upload a group of attendees, and download your full attendee list enriched with QR codes. Whether your event has 50 attendees or 5,000, the Participants section gives you the tools to manage them with precision.
 ## Viewing and Searching Registrations
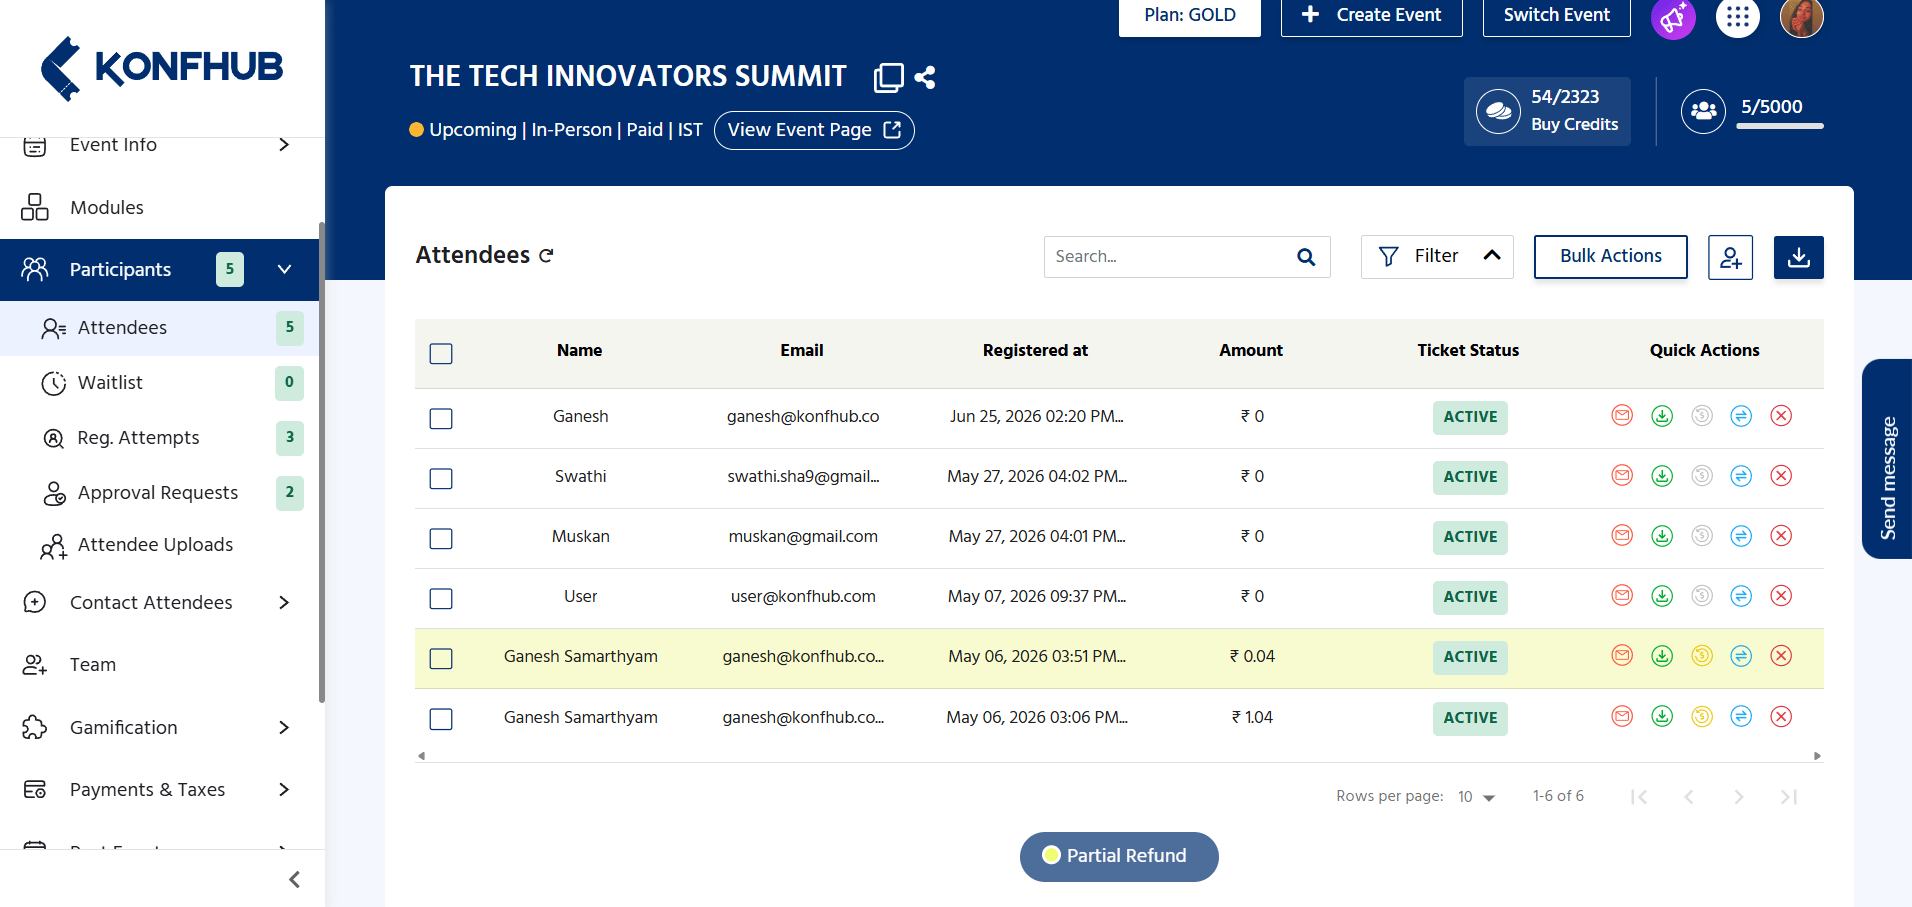
When you open the Participants section, you see a paginated table of all confirmed registrations. Each row shows the attendee's name, email address, ticket type, registration date, payment status, and ticket delivery status.
## Viewing and Searching Registrations
When you open the Participants section, you see a paginated table of all confirmed registrations. Each row shows the attendee's name, email address, ticket type, registration date, payment status, and ticket delivery status.
 ### Search
Use the **search bar** at the top of the table to find a specific attendee by:
* Full name or partial name
* Email address
* Ticket or order reference number
### Filters
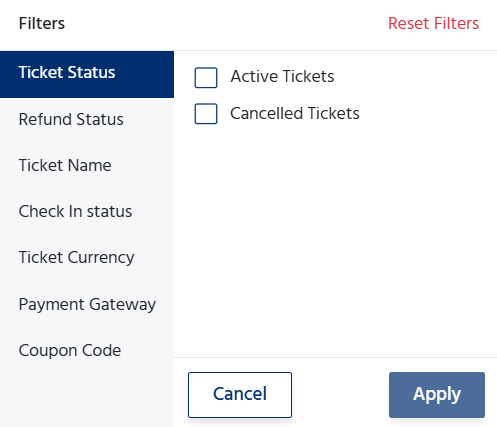
Apply one or more filters to narrow the list to a specific subset of attendees:
Show only attendees who registered for a particular ticket tier — useful when you need to communicate with VIP ticket holders separately from general admission.
Filter by Confirmed, Pending Approval, Waitlisted, Cancelled, or Rejected to focus on a specific group that requires action.
Distinguish between paid and free registrations, or identify any payments that are pending or failed.
View only registrations that occurred within a specific date window — helpful for analyzing the impact of a recent marketing campaign.
### Search
Use the **search bar** at the top of the table to find a specific attendee by:
* Full name or partial name
* Email address
* Ticket or order reference number
### Filters
Apply one or more filters to narrow the list to a specific subset of attendees:
Show only attendees who registered for a particular ticket tier — useful when you need to communicate with VIP ticket holders separately from general admission.
Filter by Confirmed, Pending Approval, Waitlisted, Cancelled, or Rejected to focus on a specific group that requires action.
Distinguish between paid and free registrations, or identify any payments that are pending or failed.
View only registrations that occurred within a specific date window — helpful for analyzing the impact of a recent marketing campaign.
 ## Approving and Rejecting Waitlisted Attendees
If your event uses approval-based registration (Silver plan and above), incoming registration requests land in a **Pending Approval** state rather than being immediately confirmed. The Participants section is where you review and act on these requests.
In the Participants table, set the status filter to **Pending Approval** to see all outstanding requests.
Click the attendee's name or row to expand their registration details, including all answers they provided in your registration form.
Select one of three actions:
* **Approve** — The attendee immediately receives a confirmation email with their ticket and QR code.
* **Reject** — The attendee is notified that their registration was not approved. They do not receive a ticket.
* **Hold** — The request remains in a pending state while you gather more information or await a decision.
## Approving and Rejecting Waitlisted Attendees
If your event uses approval-based registration (Silver plan and above), incoming registration requests land in a **Pending Approval** state rather than being immediately confirmed. The Participants section is where you review and act on these requests.
In the Participants table, set the status filter to **Pending Approval** to see all outstanding requests.
Click the attendee's name or row to expand their registration details, including all answers they provided in your registration form.
Select one of three actions:
* **Approve** — The attendee immediately receives a confirmation email with their ticket and QR code.
* **Reject** — The attendee is notified that their registration was not approved. They do not receive a ticket.
* **Hold** — The request remains in a pending state while you gather more information or await a decision.
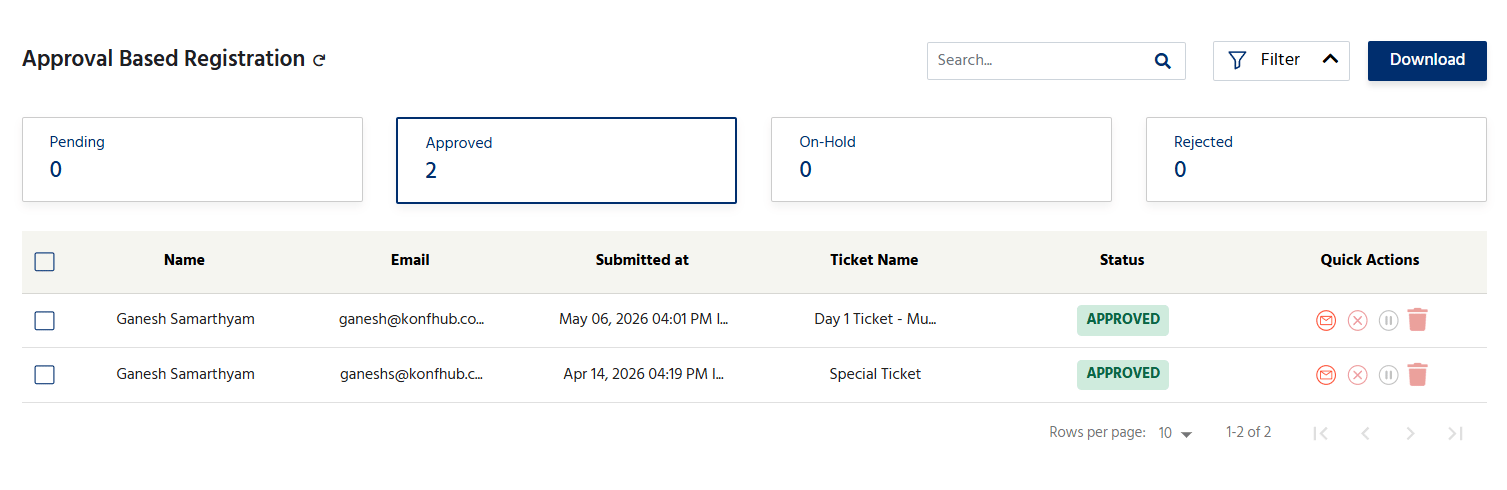 If you want to approve multiple pending requests at once, select them using the checkboxes and use the **Bulk Action** menu to approve all selected attendees simultaneously.
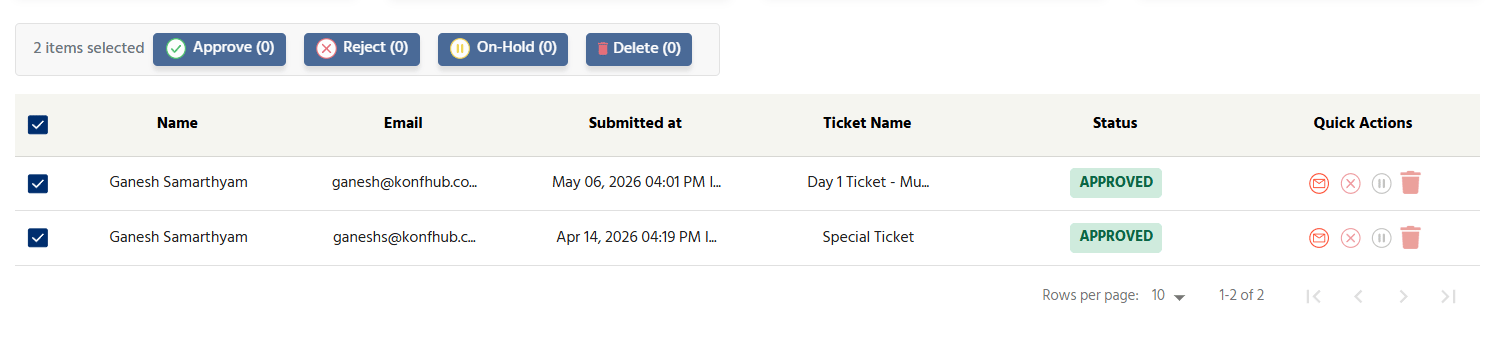 Use the **Hold** status when you receive a borderline request that needs a second opinion from a co-organizer. Your team member can review it from their dashboard access and make the final call.
## Transferring Tickets
Ticket transfers allow you, as the organizer, to reassign an existing registration from one person to another. This is useful when an attendee can no longer attend and wants a colleague or friend to take their place.
Search for the attendee whose ticket needs to be transferred.
Use the **Hold** status when you receive a borderline request that needs a second opinion from a co-organizer. Your team member can review it from their dashboard access and make the final call.
## Transferring Tickets
Ticket transfers allow you, as the organizer, to reassign an existing registration from one person to another. This is useful when an attendee can no longer attend and wants a colleague or friend to take their place.
Search for the attendee whose ticket needs to be transferred.
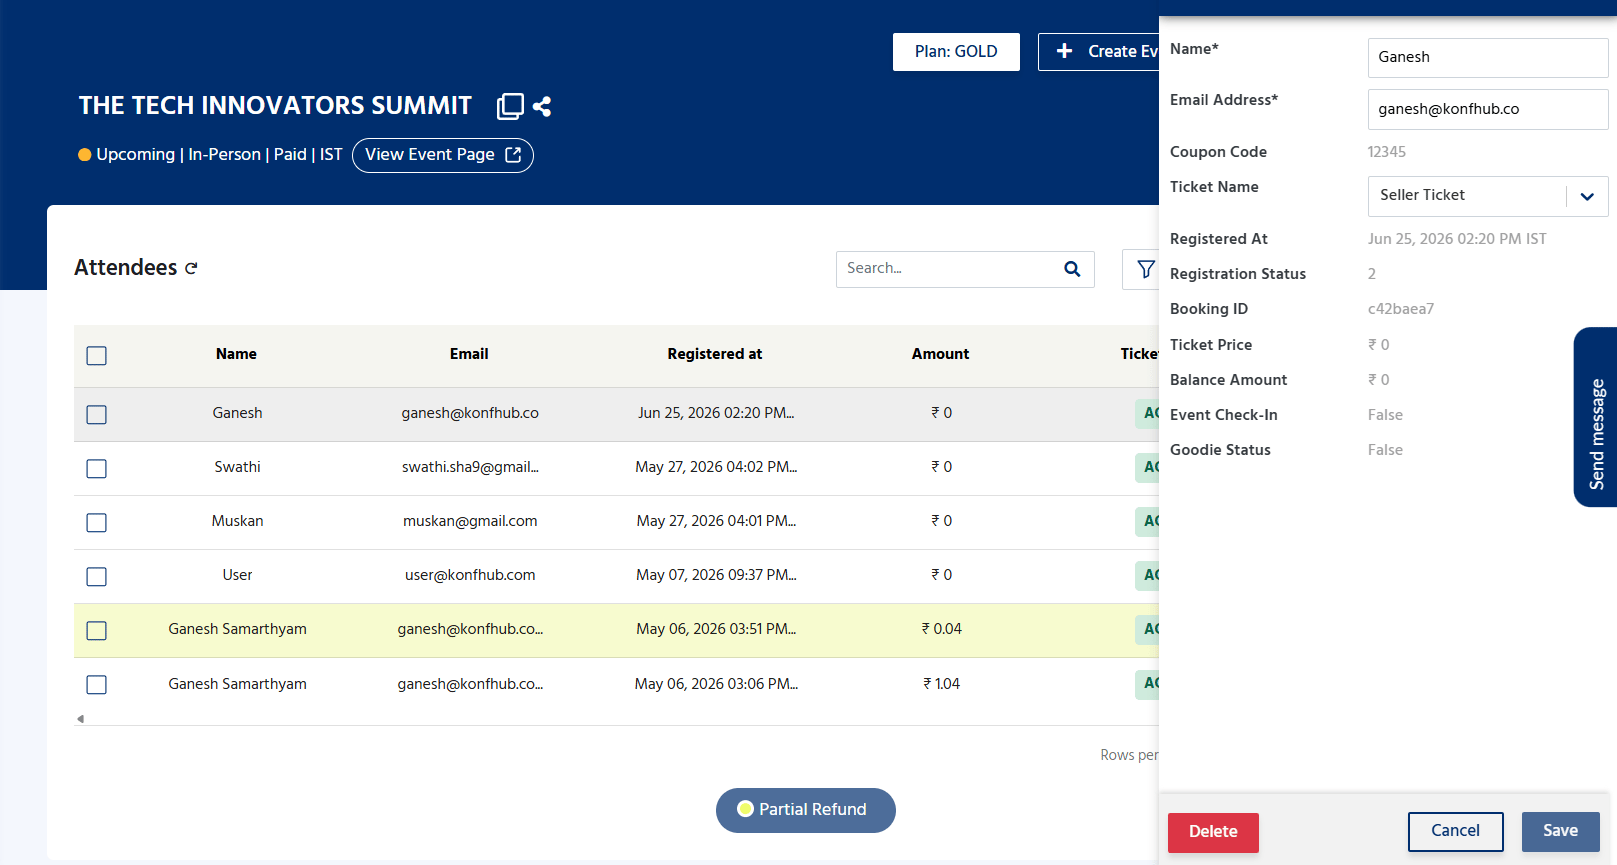
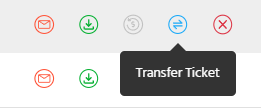 Click **Transfer Ticket** and enter the new attendee's name and email address and then click on Save.
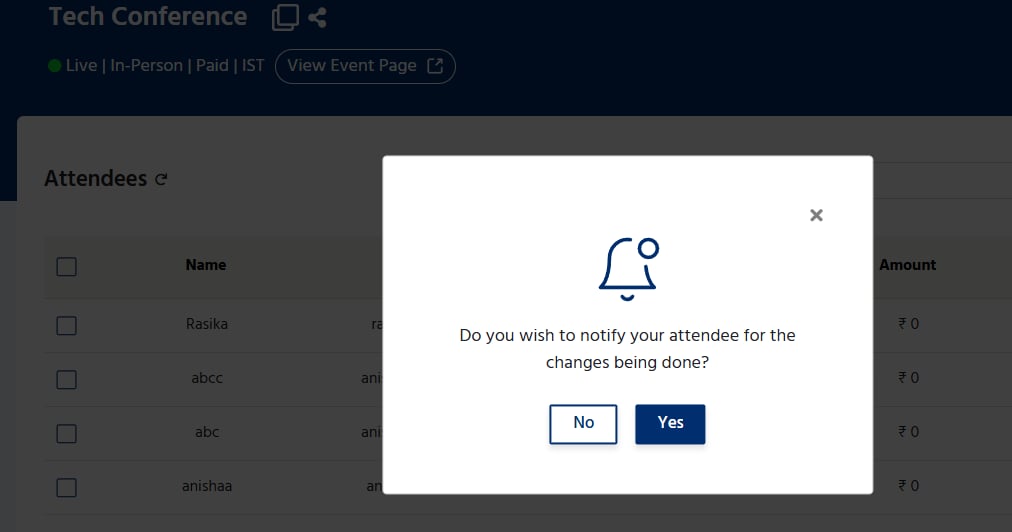
 This gives organizers the option to decide whether an email notification should be sent to the attendee.
 Review the details and confirm. The original attendee's ticket is cancelled, and a new ticket is generated and emailed to the new attendee.
A transferred ticket generates a new QR code and ticket PDF for the new attendee. The original attendee's QR code becomes invalid. Make sure you communicate this to both parties to avoid confusion at check-in.
## Processing Cancellations and Refunds
You can cancel any individual registration directly from the Participants table. For paid tickets, you can also initiate a refund back to the attendee's original payment method.
Search for the attendee by name or email.
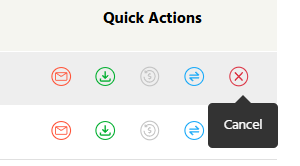
Click **Actions** in the attendee's row and select **Cancel Registration**.
Review the details and confirm. The original attendee's ticket is cancelled, and a new ticket is generated and emailed to the new attendee.
A transferred ticket generates a new QR code and ticket PDF for the new attendee. The original attendee's QR code becomes invalid. Make sure you communicate this to both parties to avoid confusion at check-in.
## Processing Cancellations and Refunds
You can cancel any individual registration directly from the Participants table. For paid tickets, you can also initiate a refund back to the attendee's original payment method.
Search for the attendee by name or email.
Click **Actions** in the attendee's row and select **Cancel Registration**.
 If the ticket was paid, choose whether to issue a full refund, partial refund, or no refund based on your event's cancellation policy.
Confirm the action. KonfHub cancels the ticket and — if a refund was selected — initiates the refund process back to the original payment method.
If the ticket was paid, choose whether to issue a full refund, partial refund, or no refund based on your event's cancellation policy.
Confirm the action. KonfHub cancels the ticket and — if a refund was selected — initiates the refund process back to the original payment method.
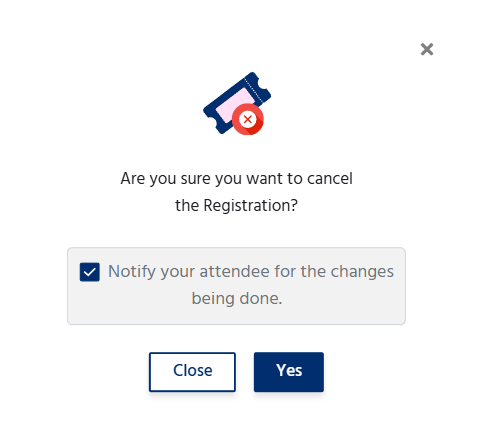 Refunds are processed through the original payment gateway and typically take 5–10 business days to appear in the attendee's account, depending on the payment method used.
Once ticket cancelled it can't be transferred.
## Editing Attendee Details
If an attendee made a typo in their name or needs to update a form field response, you can edit their details directly from the Participants table without requiring them to re-register.
Find the attendee using the search bar or scroll through the list.
Click the **Edit** icon or select **Edit Details** from the Actions menu.
Modify the attendee's name, email, phone number, or any custom registration form responses as needed.
Click **Save**. The updated details are reflected immediately in the dashboard and in any future attendee downloads.
Changing an attendee's email address updates the record in the dashboard but does not automatically re-send their ticket to the new email. Use the **Resend Ticket** option (in the Actions menu) after updating the email if the attendee needs a fresh copy.
## Bulk Attendee Actions
For large-scale operations, the bulk action feature saves significant time. Select multiple attendees using the row checkboxes and apply an action to all of them at once.
Supported bulk actions include:
* **Bulk Approve** — Approve all selected pending/waitlisted requests simultaneously.
* **Bulk Cancel** — Cancel multiple registrations in a single action.
* **Bulk Resend Tickets** — Resend ticket confirmation emails to a selected group (e.g., if your initial email bounced for a batch of attendees).
* **Bulk Forward Invoice** — Email invoices to a selected group of paid attendees.
Refunds are processed through the original payment gateway and typically take 5–10 business days to appear in the attendee's account, depending on the payment method used.
Once ticket cancelled it can't be transferred.
## Editing Attendee Details
If an attendee made a typo in their name or needs to update a form field response, you can edit their details directly from the Participants table without requiring them to re-register.
Find the attendee using the search bar or scroll through the list.
Click the **Edit** icon or select **Edit Details** from the Actions menu.
Modify the attendee's name, email, phone number, or any custom registration form responses as needed.
Click **Save**. The updated details are reflected immediately in the dashboard and in any future attendee downloads.
Changing an attendee's email address updates the record in the dashboard but does not automatically re-send their ticket to the new email. Use the **Resend Ticket** option (in the Actions menu) after updating the email if the attendee needs a fresh copy.
## Bulk Attendee Actions
For large-scale operations, the bulk action feature saves significant time. Select multiple attendees using the row checkboxes and apply an action to all of them at once.
Supported bulk actions include:
* **Bulk Approve** — Approve all selected pending/waitlisted requests simultaneously.
* **Bulk Cancel** — Cancel multiple registrations in a single action.
* **Bulk Resend Tickets** — Resend ticket confirmation emails to a selected group (e.g., if your initial email bounced for a batch of attendees).
* **Bulk Forward Invoice** — Email invoices to a selected group of paid attendees.
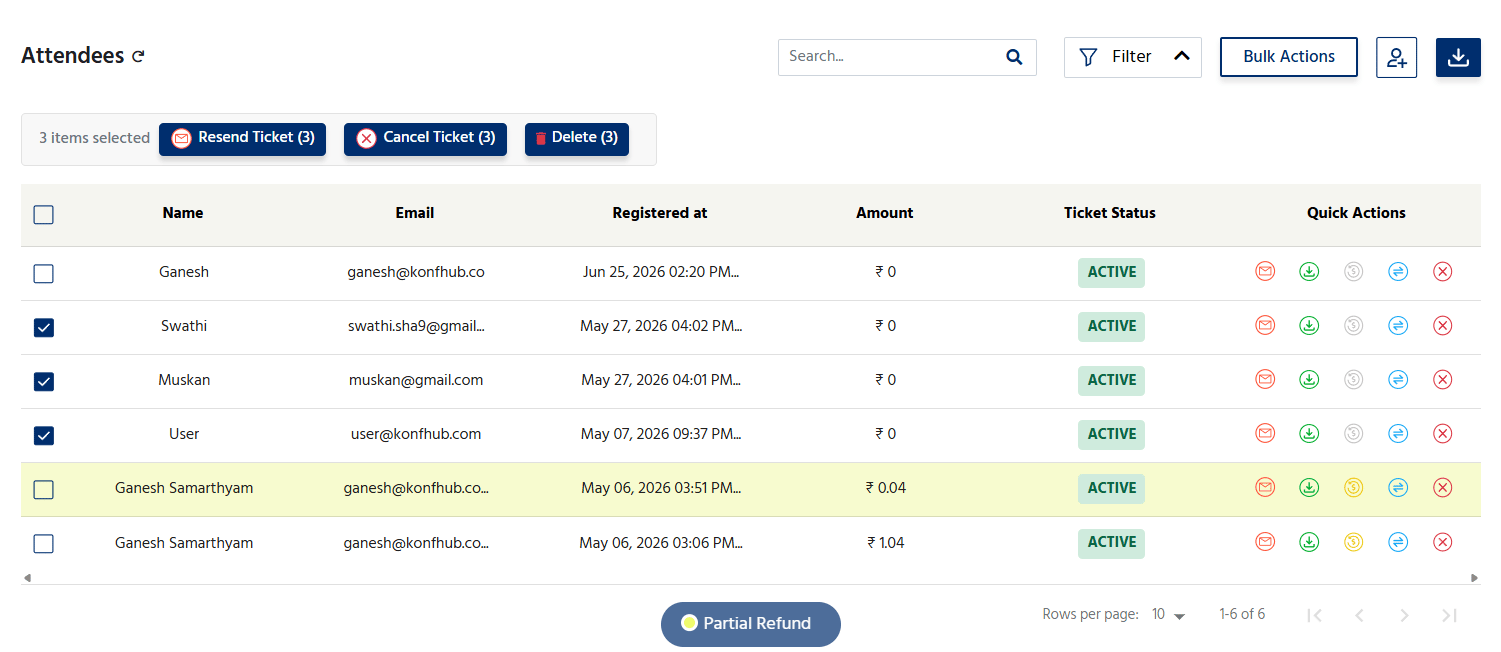 Use the filter to isolate a specific group — such as all attendees of a particular ticket type — before selecting all and applying a bulk action. This ensures you only act on the intended subset.
## Bulk Uploading Attendees
If you have a pre-existing list of attendees — from a partner organization, a previous platform, or a manual registration process — you can import them in bulk rather than entering each one individually.
Use the filter to isolate a specific group — such as all attendees of a particular ticket type — before selecting all and applying a bulk action. This ensures you only act on the intended subset.
## Bulk Uploading Attendees
If you have a pre-existing list of attendees — from a partner organization, a previous platform, or a manual registration process — you can import them in bulk rather than entering each one individually.
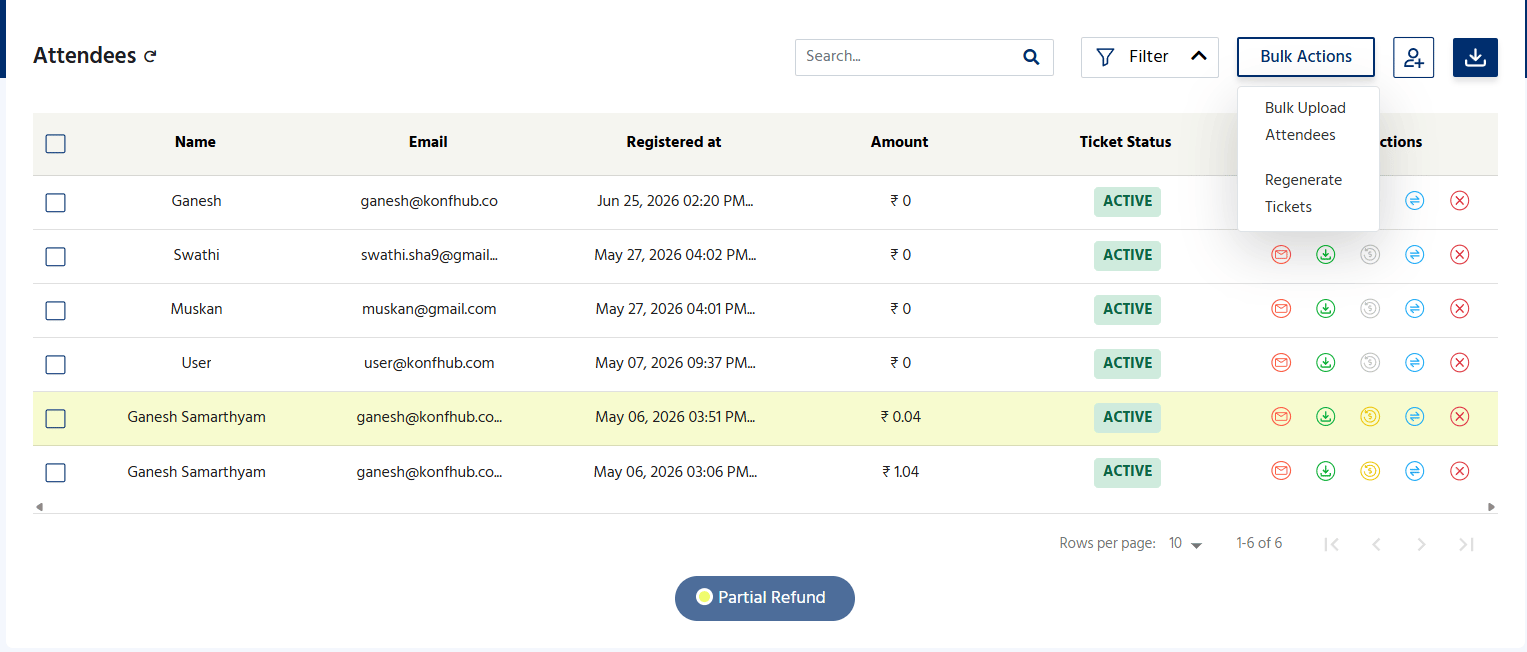 Create a CSV or Excel file with one row per attendee. Required columns include full name and email address. Additional columns can map to your event's custom registration form fields. Download the sample template from the Participants section to ensure correct formatting.
Please start entering your data from the **yellow highlighted row**. Do **not** modify or delete the header, mandatory field information, sample data, or instruction rows above, as they are required for successful bulk upload.
In the Participants section, click the **Bulk Upload** button (or look for the upload/import icon).
Select your prepared CSV or Excel file and upload it. KonfHub validates the data and flags any rows with errors (missing required fields, duplicate email addresses, etc.).
Create a CSV or Excel file with one row per attendee. Required columns include full name and email address. Additional columns can map to your event's custom registration form fields. Download the sample template from the Participants section to ensure correct formatting.
Please start entering your data from the **yellow highlighted row**. Do **not** modify or delete the header, mandatory field information, sample data, or instruction rows above, as they are required for successful bulk upload.
In the Participants section, click the **Bulk Upload** button (or look for the upload/import icon).
Select your prepared CSV or Excel file and upload it. KonfHub validates the data and flags any rows with errors (missing required fields, duplicate email addresses, etc.).
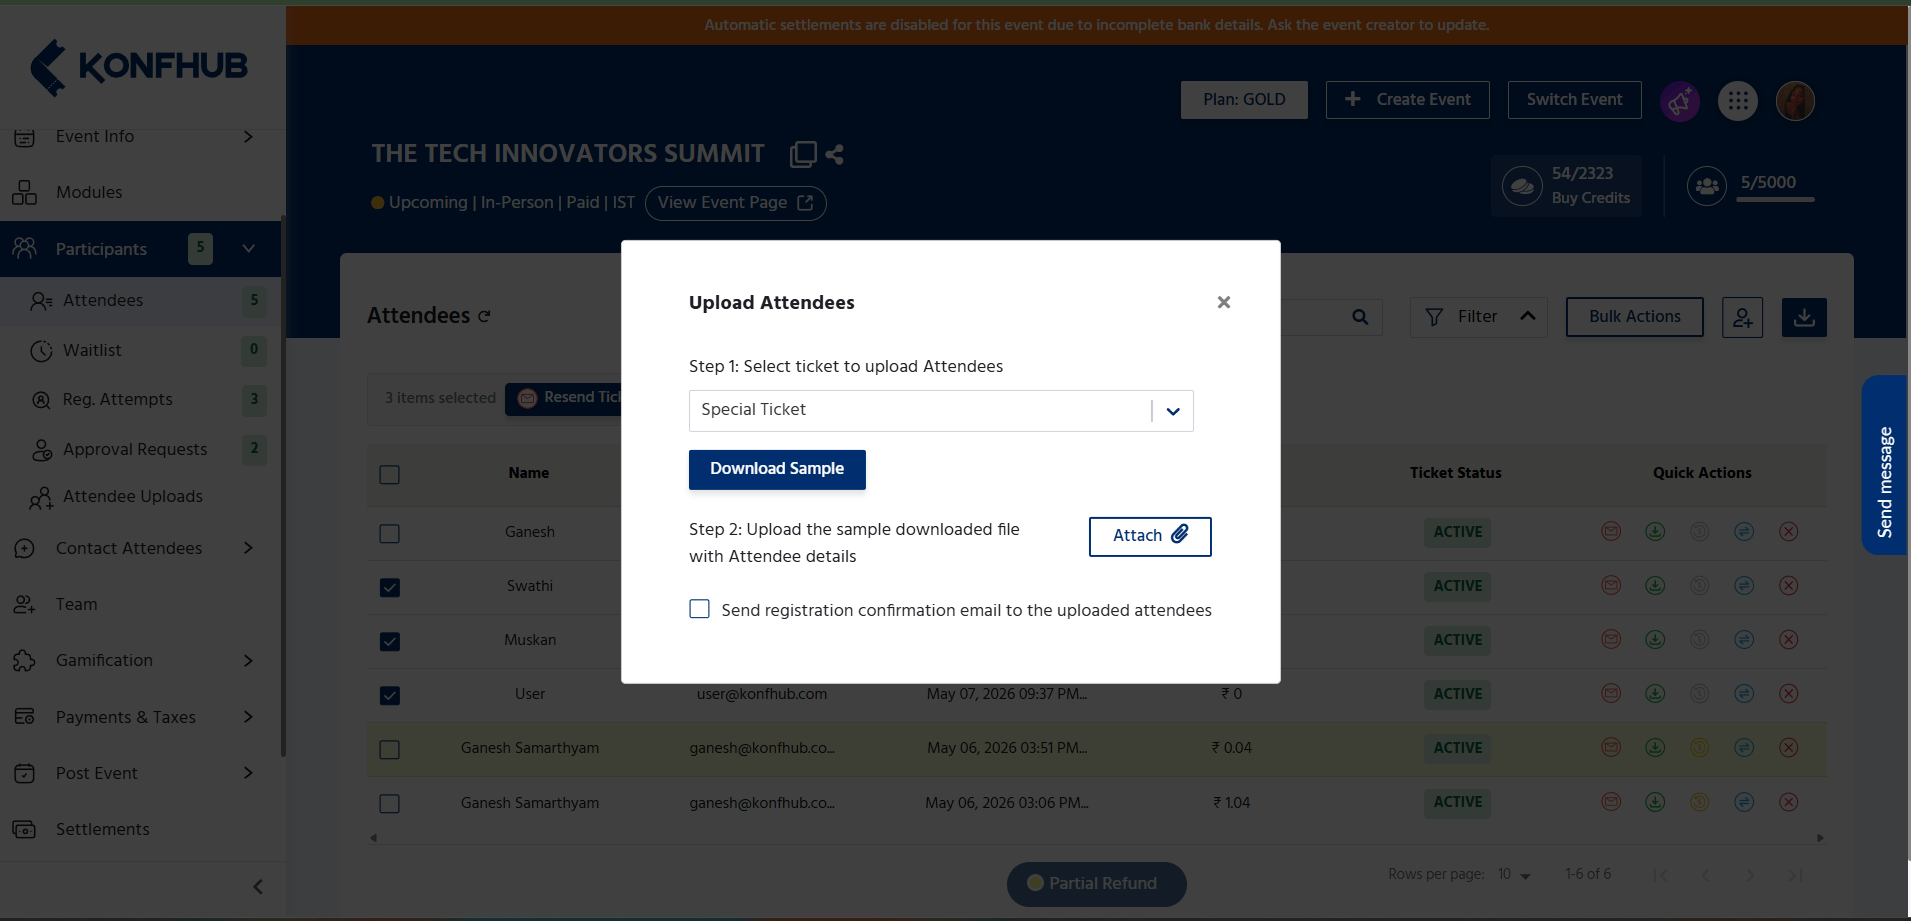 Review the validation summary. Fix any flagged errors in your file and re-upload if needed. Once the data looks correct, confirm the import.
Decide whether to automatically send each newly uploaded attendee a confirmation email with their ticket. Toggle this option on or off before finalizing the import.
The default bulk upload limit is **100 entries per batch**. If you need to upload more than 100 attendees at once, contact the KonfHub support team at [support@konfhub.com](mailto:support@konfhub.com) to request an increased limit for your event.
## Downloading the Attendee List with QR Codes
KonfHub's attendee download feature gives you a rich export of your participant data — including QR codes — that you can use for badge printing, lanyard labels, check-in preparation, or post-event analysis.
Review the validation summary. Fix any flagged errors in your file and re-upload if needed. Once the data looks correct, confirm the import.
Decide whether to automatically send each newly uploaded attendee a confirmation email with their ticket. Toggle this option on or off before finalizing the import.
The default bulk upload limit is **100 entries per batch**. If you need to upload more than 100 attendees at once, contact the KonfHub support team at [support@konfhub.com](mailto:support@konfhub.com) to request an increased limit for your event.
## Downloading the Attendee List with QR Codes
KonfHub's attendee download feature gives you a rich export of your participant data — including QR codes — that you can use for badge printing, lanyard labels, check-in preparation, or post-event analysis.
 Use the search and filter tools to narrow your export to a specific subset of attendees, such as a particular ticket type or date range.
Click the **Download** button in the Participants section toolbar. A dialog box appears with export options.
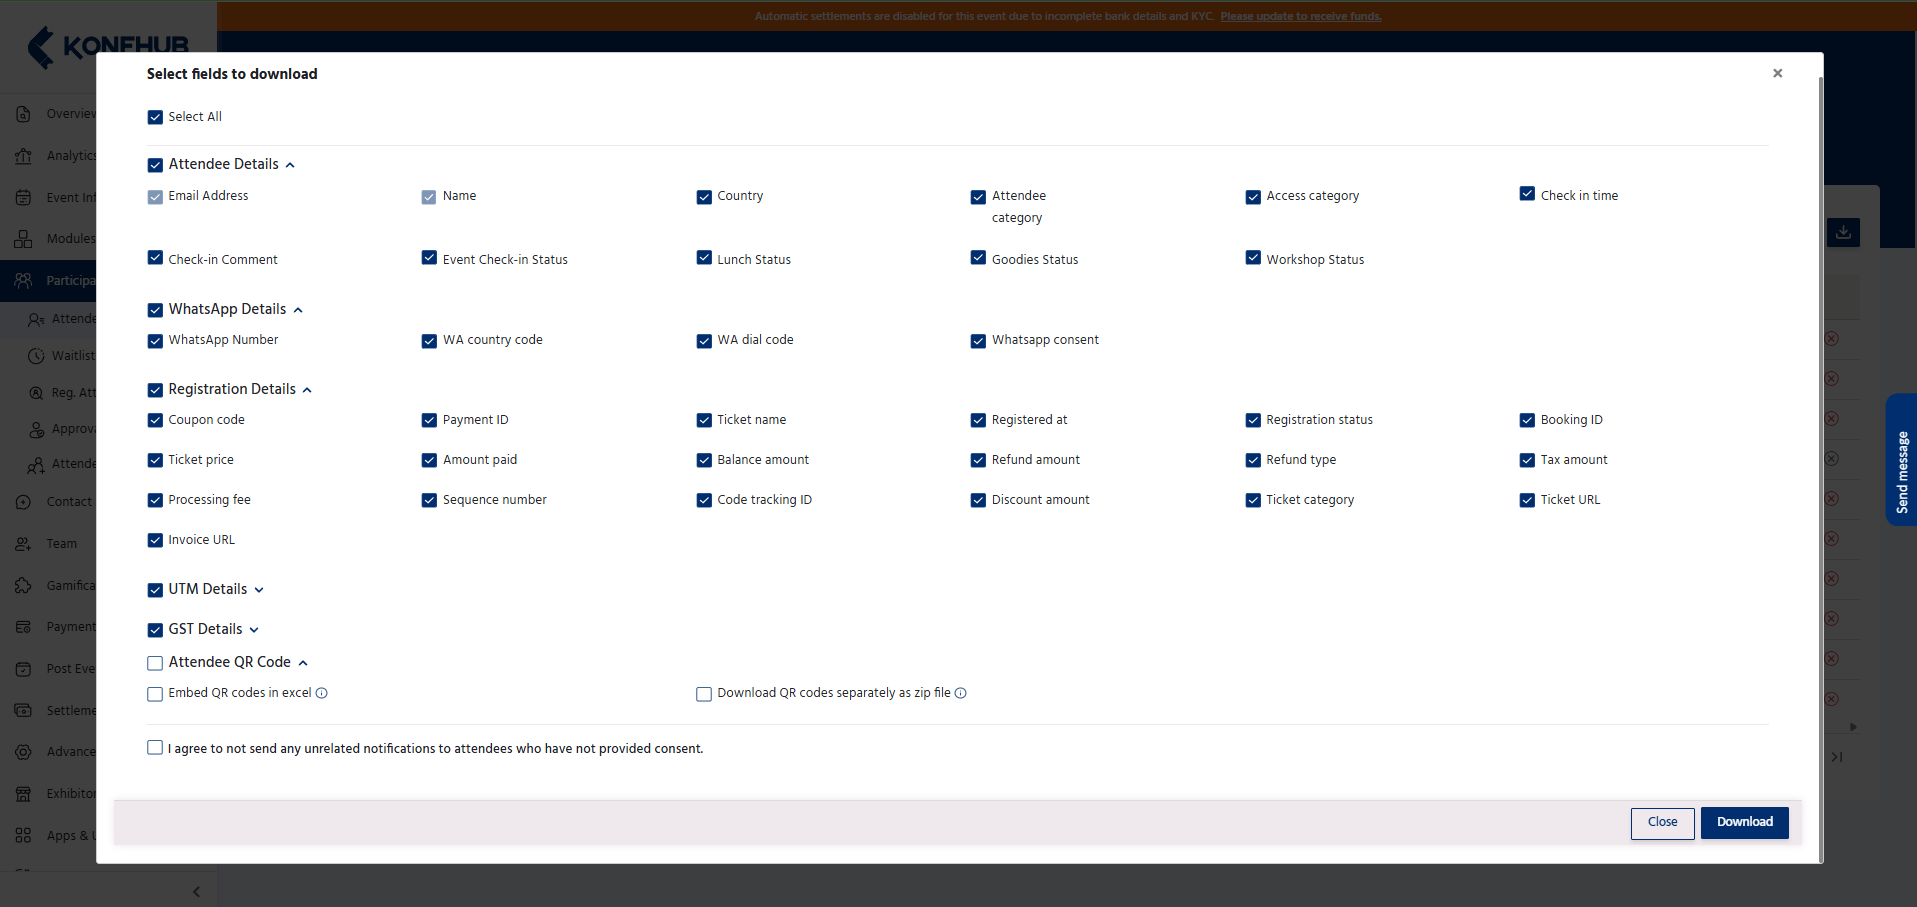
Choose which data columns to include in the export — name, email, ticket type, registration form responses, QR code image URL, ticket PDF URL, invoice URL, and more.
Select the format in which you want to download the attendee QR codes.
Use the search and filter tools to narrow your export to a specific subset of attendees, such as a particular ticket type or date range.
Click the **Download** button in the Participants section toolbar. A dialog box appears with export options.
Choose which data columns to include in the export — name, email, ticket type, registration form responses, QR code image URL, ticket PDF URL, invoice URL, and more.
Select the format in which you want to download the attendee QR codes.
 Click **Export** to generate and download the file. The export is in Excel (XLSX) or CSV format and includes a QR code column with direct image links or embedded QR images, depending on your selection.
Download the attendee list with QR codes a day before your event and load it into your check-in app or badge printing software. Having an offline backup ensures smooth check-in even if connectivity is unstable on event day.
## Registration Attempts
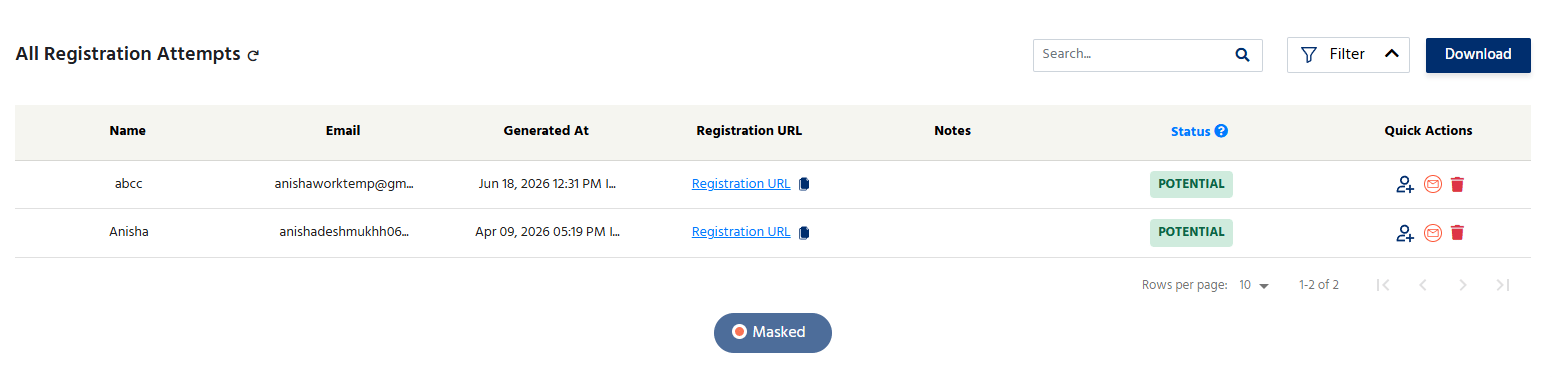
In addition to confirmed registrations, KonfHub tracks **Registration Attempts** — visitors who started the registration process but did not complete it. These are potential leads who showed interest in your event but dropped off before confirming.
Navigate to the **Registration Attempts** tab within the Participants section to see:
* The visitor's email address (if they entered it before abandoning the form).
* The ticket type they were attempting to register for.
* The date and time of the attempt.
* The stage at which they dropped off (e.g., form submission vs. payment).
Use this data to send targeted follow-up campaigns via the **Contact Attendees** section, encouraging these high-intent prospects to complete their registration with a reminder or a limited-time discount code.
Click **Export** to generate and download the file. The export is in Excel (XLSX) or CSV format and includes a QR code column with direct image links or embedded QR images, depending on your selection.
Download the attendee list with QR codes a day before your event and load it into your check-in app or badge printing software. Having an offline backup ensures smooth check-in even if connectivity is unstable on event day.
## Registration Attempts
In addition to confirmed registrations, KonfHub tracks **Registration Attempts** — visitors who started the registration process but did not complete it. These are potential leads who showed interest in your event but dropped off before confirming.
Navigate to the **Registration Attempts** tab within the Participants section to see:
* The visitor's email address (if they entered it before abandoning the form).
* The ticket type they were attempting to register for.
* The date and time of the attempt.
* The stage at which they dropped off (e.g., form submission vs. payment).
Use this data to send targeted follow-up campaigns via the **Contact Attendees** section, encouraging these high-intent prospects to complete their registration with a reminder or a limited-time discount code.
 ## Single Registrations
The **Single Registration** option allows organizers to manually register an attendee for a selected ticket type without requiring the attendee to complete the online registration process.
## Select Ticket
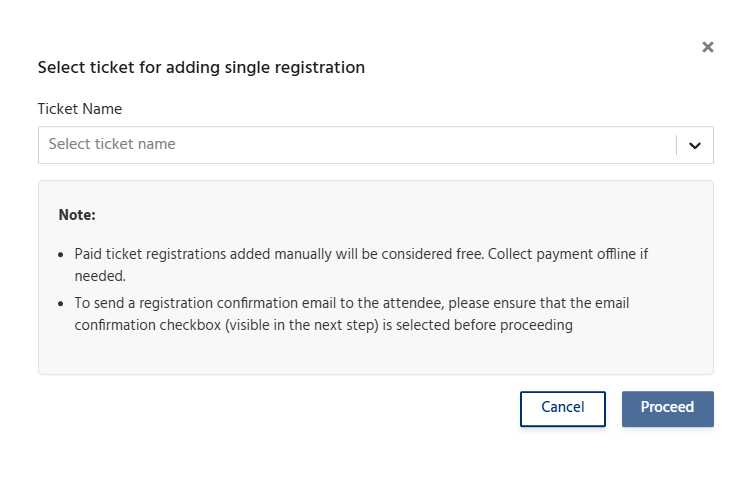
Before adding a registration, select the appropriate **Ticket Name** from the dropdown list. The attendee will be registered under the selected ticket category.
## Single Registrations
The **Single Registration** option allows organizers to manually register an attendee for a selected ticket type without requiring the attendee to complete the online registration process.
## Select Ticket
Before adding a registration, select the appropriate **Ticket Name** from the dropdown list. The attendee will be registered under the selected ticket category.
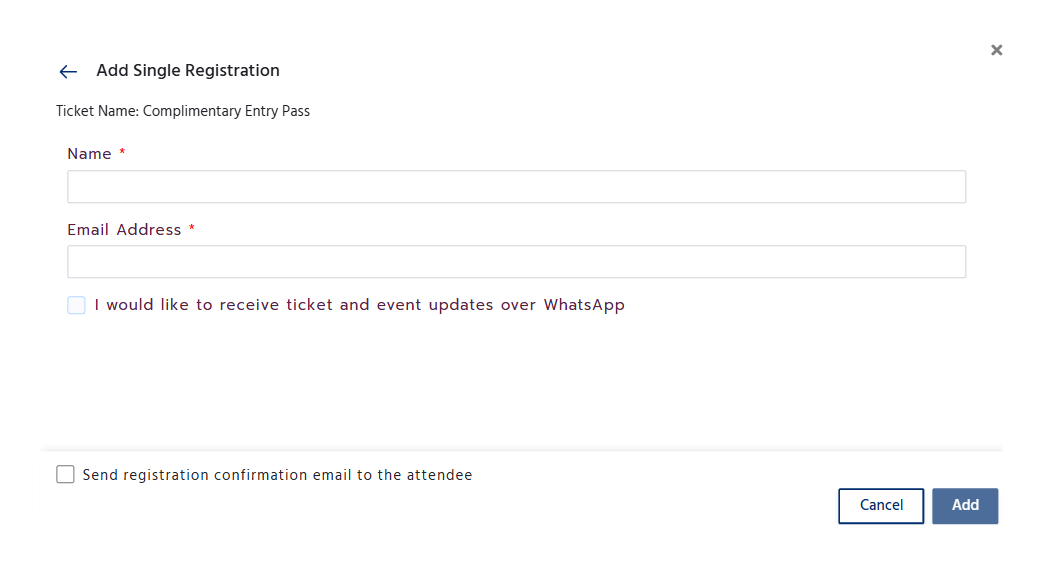
 After selecting a ticket and clicking **Proceed**, the **Add Single Registration** form opens. This form allows organizers to manually register an attendee by entering their details.
## Registration Details
Enter the following mandatory information:
* **Name** – Enter the attendee's full name.
* **Email Address** – Enter a valid email address for the attendee. This email can be used to send the registration confirmation and event updates.
After selecting a ticket and clicking **Proceed**, the **Add Single Registration** form opens. This form allows organizers to manually register an attendee by entering their details.
## Registration Details
Enter the following mandatory information:
* **Name** – Enter the attendee's full name.
* **Email Address** – Enter a valid email address for the attendee. This email can be used to send the registration confirmation and event updates.
 Fields marked with an asterisk (\*) are mandatory and must be completed before the registration can be added.
This screen completes the manual registration process, allowing organizers to quickly add individual attendees while optionally sending them confirmation emails and event updates. The attendee will be added.
The **"I would like to receive ticket and event updates over WhatsApp"** checkbox allows the attendee to opt in to receive WhatsApp message . Select this option only if the attendee has agreed to receive WhatsApp communications.
The **Send registration confirmation email to the attendee** checkbox determines whether a confirmation email is sent after the registration is created. If left unchecked, the attendee will be registered successfully, but no confirmation email will be sent.
Fields marked with an asterisk (\*) are mandatory and must be completed before the registration can be added.
This screen completes the manual registration process, allowing organizers to quickly add individual attendees while optionally sending them confirmation emails and event updates. The attendee will be added.
The **"I would like to receive ticket and event updates over WhatsApp"** checkbox allows the attendee to opt in to receive WhatsApp message . Select this option only if the attendee has agreed to receive WhatsApp communications.
The **Send registration confirmation email to the attendee** checkbox determines whether a confirmation email is sent after the registration is created. If left unchecked, the attendee will be registered successfully, but no confirmation email will be sent.